

Table of Contents
Updated November 2026
Quick Answer: The Best Way to Drip-Water a Raised Bed
Raised beds dry out faster than in-ground gardens, so drip works best when it wets the whole bed, not just one spot per plant. For a standard 4×8 bed, run three or four lines of emitter tubing down the length of the bed, about 8 to 12 inches apart, fed from a header at one short end. Connect it through a backflow preventer, filter, and pressure regulator, and add a hose timer.
Our top pick for one bed is the Rain Bird GARDENKIT, which is sized for a 4×8 bed. For several beds, build a layout with 1/2-inch supply tubing and emitter line.
Not sure which setup fits your garden? Start here:
- One 4×8 box: an all-in-one raised bed kit.
- Straight rows of lettuce, carrots, onions, or beans: drip tape.
- Mixed plantings or several beds: 1/2-inch supply tubing with emitter line in each bed.
- A small 4×4 bed or herb box: 1/4-inch emitter dripline looped in an S shape.
- You just want to lay something down and connect a hose: a pre-assembled watering grid.
This guide is part of our irrigation series. For a broader comparison of drip, soaker hose, and sprinkler systems, see our guide to the best irrigation system for a vegetable garden.
Why Raised Beds Need a Different Watering Plan
They drain and dry faster
A raised bed is built for drainage. The soil sits above ground, the sides warm up in the sun, and most raised bed mixes are loose and fast-draining. That is great for roots, but the top few inches can dry out within a day or two in summer heat.
Drip delivers water slowly at the soil surface, so it soaks in instead of running off the sides. The catch is coverage: one emitter per transplant wets a narrow cone of soil, while roots spread through the whole box. That is why the layouts below use lines with emitters every 6 to 12 inches.
Why overhead sprinklers are a poor fit in a box
Sprinklers throw water over paths, frames, and leaves, so much of it lands outside the box, and wet foliage can encourage leaf diseases on tomatoes, squash, and cucumbers. A good hose nozzle is still handy for watering in seedlings and topping up containers.
Choose Your Method
All-in-one raised bed kit
A kit bundles the faucet adapter, regulator, tubing, fittings, and stakes in one box. It is the fastest way to water a single bed. The tradeoff is reach: most kits are sized for one bed.
Drip tape for straight rows
Drip tape is thin, flat tubing with emitters every few inches. It is cheap per foot and suits straight rows. Most tape runs at low pressure, so use the regulator the tape maker specifies. It punctures easily and usually lasts a few seasons.
1/4-inch emitter dripline for small or mixed beds
Quarter-inch dripline has emitters built in, often every 6 inches, and bends easily around plants in a 4×4 bed or herb box. It carries far less water than 1/2-inch tubing, so keep runs within the length on the package.
1/2-inch emitter tubing for a longer-lasting, multi-bed setup
For several beds, run 1/2-inch supply tubing past the ends of the beds and tee into each one with emitter line. It carries enough water for long runs, lasts for years, and is easy to expand.
When a soaker hose is enough
A soaker hose is the cheapest option and works for dense plantings like greens, but it waters less evenly over long runs. See our drip irrigation vs. soaker hose comparison for the full pros and cons.
Layouts for Common Raised Bed Sizes
4×4 bed
Feed a single 1/4-inch emitter line in at one corner and loop it back and forth in an S shape so the passes sit about 12 inches apart. Three passes across a 4-foot bed, plus the turns, uses roughly 14 to 16 feet of dripline.
4×8 bed (the most common size)
Put a short header at one 4-foot end and run four lines down the 8-foot length, spaced about 12 inches apart. For sandy mixes or shallow-rooted crops, use five lines at 8 to 10 inches. Four 8-foot lines take about 32 feet of emitter tubing, which is why kits like the Rain Bird GARDENKIT ship with a 35-foot coil. Close each line with an end cap or a figure-8 end so you can flush it later.
Several beds on one faucet
Run 1/2-inch supply tubing from the faucet assembly along the short ends of the beds. At each bed, add a tee and run emitter tubing down the bed. If the far beds get noticeably less water, split them into two zones on a two-outlet timer.
If you are still building your boxes, read our guides to the best wood for raised garden beds and whether pressure-treated wood is safe for garden boxes.
Best Drip Irrigation Kits and Parts for Raised Beds
We matched each product to a raised bed setup and checked the current Amazon listing for what is in the box. We have not tested them side by side, so the details come from the manufacturers’ listings. Prices change often, so check the current price on Amazon.
| Product | Best for | What it covers | Regulator / filter | Timer included? |
|---|---|---|---|---|
| Rain Bird GARDENKIT | One 4×8 raised bed | 35 ft of 1/4″ emitter tubing, 6″ spacing | 25 PSI regulator with filter washer | No |
| Garden Grid 4×8 | Fastest setup, square-foot gardens | Pre-assembled 44 x 88 in. grid | Not needed (built-in filter) | No |
| Habitech 1/4″ Dripline | DIY layouts, 4×4 beds, mixed plantings | 100 ft roll, 0.5 GPH emitters every 6″ | Sold separately | No |
| Habitech Faucet Adapter Kit | Multi-bed 1/2″ setups | Connects 1/2″ tubing to a faucet | Backflow preventer, filter, 25 PSI regulator | No |
| Orbit Digital Hose Timer | Automating any kit | One faucet outlet | n/a | It is the timer |
1. Rain Bird GARDENKIT Raised Bed Drip Irrigation Kit
Best kit for one 4×8 bed
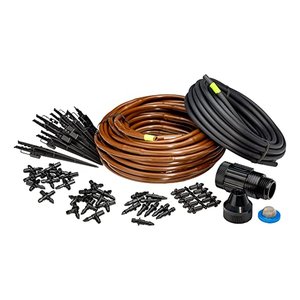
- Coverage: Up to one 4 x 8 ft raised bed, per Rain Bird
- Emitter tubing: 35 ft of 1/4″ tubing with 70 built-in emitters every 6″
- Supply tubing: 25 ft of 1/4″ blank distribution tubing
- Faucet assembly: 3/4″ faucet adapter and 25 PSI regulator with 150 mesh filter washer
- Timer: Not included
This is the most straightforward way to put drip on one bed. Black distribution tubing runs from the faucet to the bed, and the brown emitter tubing lays out in rows inside it. Four 8-foot runs cover a 4×8 bed, and the included elbows, couplers, and end caps let you match your planting. The emitters are pressure-compensating, so both ends of each line water about the same.
The limit is reach: Rain Bird says not to extend the kit with more 1/4-inch tubing, because flow drops off. For a second bed, buy a second kit. There is no backflow preventer, so add one if your local code requires it.
Pros
- Sized specifically for a 4×8 bed
- Includes the regulator and a filter washer
- Pressure-compensating emitters water evenly
Cons
- Not meant to be extended to more beds
- No backflow preventer or timer in the box
2. Garden Grid 4×8 Raised Bed Watering System
Easiest setup
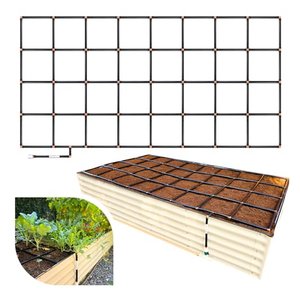
- Size: 44 x 88 in. grid that fits inside most 4×8 beds
- Layout: 32 planting squares, each with its own set of small water streams
- Pressure: Works from about 10 PSI on standard household pressure; no pressure reducer needed, per the maker
- Filter: Built in
- Timer: Not included
The Garden Grid is not strictly drip irrigation. It is a pre-assembled tubing grid that sends small streams to the soil in every square. Set it on the bed, connect a hose, and turn on the water. There is nothing to cut or punch.
Each square doubles as a square-foot planting guide. It costs more than a basic kit, and the maker says to disconnect it before freezing weather. Extra grids connect with manifolds sold separately.
Pros
- No cutting or emitter placement
- Even coverage across all 32 squares
- No regulator needed
Cons
- Costs more than a basic drip kit
- Streams, not true drip, so more water per minute
- Fixed size: a different grid for each bed size
3. Habitech 1/4″ Irrigation Dripline Tubing (100 ft)
Best for DIY layouts
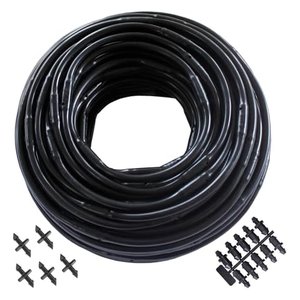
- Length: 100 ft roll
- Emitters: 0.5 GPH built in every 6″
- Fittings: Barbed 1/4″ couplings and other fittings included
- Max pressure: 50 PSI listed
- Regulator / faucet kit: Sold separately
This dripline is a flexible building block for your own layout: loop it through a 4×4 bed, run it down a 4×8, or tee it off a 1/2-inch supply line. A 100-foot roll covers about three 4×8 beds with four lines each.
Keep each run short and feed long layouts from a 1/2-inch header. You will also need a faucet assembly with a regulator and filter, such as the Habitech kit below.
Pros
- Emitters built in at a raised-bed-friendly 6-inch spacing
- Bends easily around plants and corners
- Enough for several beds
Cons
- Needs a separate regulator, filter, and faucet adapter
- Short maximum runs compared with 1/2-inch tubing
4. Habitech Drip Irrigation Faucet Adapter Kit
Best faucet assembly for multi-bed setups
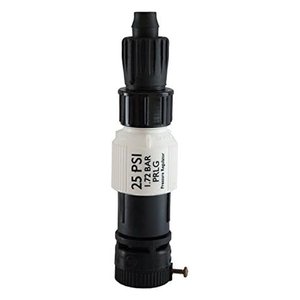
- Connects: 1/2″ drip tubing (about .520 to .620 in. ID) to a standard 3/4″ faucet or hose
- Includes: Backflow preventer, 150 mesh filter, Senninger 25 PSI pressure regulator
- Assembly: Comes pre-assembled
For a multi-bed layout built from parts, this combines the three things a drip system needs at the faucet: a backflow preventer, a filter to catch grit, and a regulator that brings household pressure down to 25 PSI. It arrives assembled and threads onto the faucet or a hose timer.
Check your tubing first. The fitting is made for 1/2-inch tubing with an inside diameter of about .520 to .620 inches. Some brands sell larger .700 ID tubing as “1/2-inch,” and that will not fit.
Pros
- Backflow, filter, and regulator in one assembly
- Pre-assembled and ready to use
- Pairs with any timer that threads onto a faucet
Cons
- Fits only certain 1/2-inch tubing sizes
- No tubing or emitters included
5. Orbit Single-Outlet Programmable Digital Hose Timer
Best add-on timer
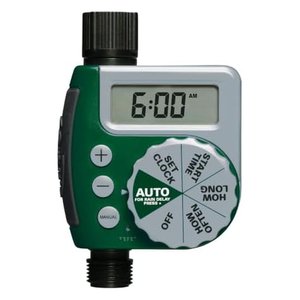
- Outlets: 1
- Power: Battery
- Controls: LCD screen with programmable watering schedules
- Extras: Built-in rain delay
- Warranty: Six-year limited warranty, per Orbit
None of the kits above includes a timer, and a timer is what makes drip hands-off. This Orbit model threads onto the faucet and your kit connects to its outlet. The rain delay skips watering after a storm without reprogramming.
To water two groups of beds separately, choose a two-outlet timer such as the Rain Bird HET200 from our Rain Bird guide.
Pros
- Turns any drip kit into an automatic system
- Rain delay button
- Long warranty for a hose timer
Cons
- Single outlet only
- Needs fresh batteries each season
The Faucet Assembly You Should Not Skip
Most drip problems start at the faucet, not in the bed. With a timer, the usual order from the spigot is:
- Timer, threaded directly onto the faucet.
- Backflow preventer, which keeps water from the garden being pulled back into your household plumbing. Many local plumbing codes require one on irrigation lines.
- Filter, usually 150 to 200 mesh, which catches sand and grit that would otherwise clog the emitters.
- Pressure regulator, which lowers household pressure to the range the tubing is designed for. Home drip kits commonly use 25 PSI regulators.
- Tubing adapter, which connects to your supply line.
Combined faucet kits like the Habitech and Rain Bird assemblies already put the backflow preventer, filter, and regulator in the right order. If a manufacturer’s instructions show a different order, follow them.
How Long to Run Drip in a Raised Bed
Run time depends on your soil mix, weather, mulch, and emitter flow, but you can work out a starting point. A 4×8 bed covers 32 square feet, and putting an inch of water on that area takes about 20 gallons. Four 8-foot lines with 0.5 GPH emitters every 6 inches put out roughly 32 gallons per hour, so about 35 to 40 minutes delivers close to an inch.
A reasonable start is 20 to 40 minutes two or three times a week in summer, less in cool weather. A few hours after watering, check the soil 2 to 3 inches down. It should feel evenly moist, not soggy or dry. Adjust from there. Our guide on how often you should water a garden covers schedules by season and crop.
Mulch, Clogs, and Winterizing
Mulch over the lines
Cover the lines with 2 to 3 inches of straw or shredded leaves. Mulch slows evaporation and shields the tubing from the sun. See our picks for the best vegetable garden mulch.
Filters and flushing
Rinse the filter screen every few weeks, more often on well water, and open the end caps a few times a year to flush out sediment. If one spot stays dry, look for a clogged emitter or kinked line before raising the run time.
Drain or blow out before a freeze
Water left in tubing can freeze and split fittings. Before the first hard freeze, bring the timer, regulator, and filter indoors, then open the end caps and let the lines drain. The tubing itself can stay in the bed or be coiled and stored.
Frequently Asked Questions
What is the best drip irrigation system for raised beds?
For a single 4×8 bed, an all-in-one kit like the Rain Bird GARDENKIT is the simplest choice because it is sized for that bed and includes the regulator. For several beds, a 1/2-inch supply line with emitter tubing in each bed is more flexible and easier to expand.
How many drip lines does a 4×8 raised bed need?
Most 4×8 beds need three or four lines run down the 8-foot length, about 8 to 12 inches apart. Use the closer spacing for sandy or very loose soil mixes and for shallow-rooted crops like lettuce.
Should I use drip tape or emitter tubing in a raised bed?
Drip tape is cheaper and works well for straight rows, but it punctures easily and usually lasts only a few seasons. Emitter tubing costs more and lasts longer. It is the better choice for mixed plantings and permanent beds.
Do raised beds need to be watered more often than in-ground gardens?
Usually, yes. They drain faster and warm up more in the sun, especially in summer. Mulch and drip both help the soil stay moist longer.
Can I water several raised beds from one outdoor faucet?
Yes. Run 1/2-inch supply tubing from one faucet assembly to all the beds and tee into each one. If the far beds get less water, split them into two zones on a two-outlet timer.
Can I use a gravity-fed rain barrel on a raised bed?
Sometimes, but not with most standard kits. A rain barrel gives well under 1 PSI per foot of height, while most kits are designed for household pressure. Use a kit made for gravity or low-pressure systems, raise the barrel, and keep runs short.
Related Guides
- Best Irrigation System for a Vegetable Garden
- Best Rain Bird Drip Irrigation Kits
- Drip Irrigation vs. Soaker Hose
- How Often Should You Water a Garden?
- Best Wood for Raised Garden Beds

I’m John, a “seasoned citizen” and an avid gardener. I live in Minnesota, where our weather and growing conditions can be harsh and challenging. Over the years, I have learned a thing or two about being successful in growing things. I have curated these tips, which I think are helpful for the beginning gardener and the seasoned experts. If you have feedback, let me know in the contact form.